I participated in an Influencer Activation Program on behalf of Influence-Central for Littlest Pet Shop. I received a sample to facilitate my review and a thank you item for participating. All opinions are my own.My daughter loves Littlest Pet Shop. She watches the show and loves the toys. We had a ton of the "old" style Littlest Pet Shop toys but cleared things out when I found out about a Littlest Pet Shop party I would get to host thanks to Influence-Central. I was sent an awesome … [Read more...]
Dragon Birthday Cake!

Last year I made my oldest daughter a dragon cake, and this year, my youngest daughter wanted a dragon cake. I have used box mixes in the past, and they were fine, but this year I looked up a yellow cake recipe from Martha Stewart. It is still a bit crumby when I tried to ice it, but it was fine. Next time, I’ll try to find a different cake mix; one that doesn’t fall to crumbs when you cut it! I’m just not that skilled yet! I used a butter cream icing recipe from … [Read more...]
Have A Party At Play-dip-i-ty!
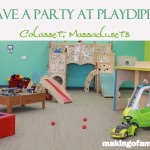
This past weekend we celebrated our soon to be two year old daughters birthday at Playdipity. I love Playdipity. Playdipity is located in Cohasset Massachusetts. It is a one of a kind place to play and pretend. About a year ago we went there for our first time during the huge power outage the east coast was having. They had power and we had a blast. As a teacher I appreciated the cleanliness and organization of the space. It was bright and colorful and had so many fun activities for my … [Read more...]
Make some ‘Sweet’ Party Glasses
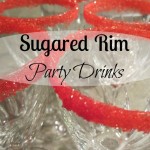
Today I am preparing for my New Year's Eve party with some friends and their children. We don't drink, but we like to have a good time. I thought it would be fun to jazz up our Martinelli's with some sugar rimmed glasses. It's easy, only involves two ingredients and has 2 steps! Once you gather the supplies - glasses, a lemon sliced up, colored sugar - you are ready to being. Rub the lemon slice around the rim of the glass getting it fully wet with the juice. Dip the … [Read more...]
Murder Mystery Maniacs Party

Disclaimer: I was provided all of the supplies to host this amazing party complimentary for review purposes. All experiences and opinions are my own. Yours may differ.Murder Mystery Maniacs is company that provides murder mystery parties. They have an amazing number of themes to choose from. They have different types of parties such as dinner parties, corporate events and teen themed parties. Each provide an enjoyable evening for an impressive amount of guests. As you can see, I had a fun … [Read more...]
Fancy Nancy Party Featuring The Orb Factory

Disclaimer: I received the following products for review purposes. No other compensation was received. All opinions and experiences are 100% my own. Your experience may differ. If you click a link in this post, you will be taken to the sponsor's site.When we find a series of books we love we stick to it! We love Fancy Nancy at our house. She is such a sweet little girl with some high style! My daughter was very excited to learn that The Orb Factory wanted her to throw a Perfectly Posh Fancy … [Read more...]
Latka!

Okay, so I know I said on Tuesday that I would give 2 recipes today, but instead I'm doing 1 now and 1 more next Tuesday!I've NEVER been able to make hash browns stick together! So I knew I this was going to be a challenge, but it looked so yummy I had to try! This is what it's supposed to look like: But mine turned into a pile of super delicious shredded potatoes! (And I DO mean super Delicious! My 4 year old said, "Oh this dinner is SOOO yummy! Thanks for making such a yummy dinner … [Read more...]
Gyspy Melting Pot

Okay folks, you know how I feel about creative and simple recipes! I just fell in LOVE with Gyspys Melting Pot! They do an awesome job compiling super cute and totally adorable recipes and crafts that are so simple and so creative! I was so excited to share them with you! I’ll post 2 today and 2 more on Thursday.Christmas treeGypsys Melting Pot made it with veggies, (Click here to see theirs!) but my kids are MUCH more likely to eat fruit! And our family tradition is a Christmas … [Read more...]
Signazon.com Review

We’ve got a new website for you! Signazon.com makes any kind of sign you can think of! So fun! I made this banner for Halloween. It is great quality; thick and sturdy and it even comes with metal grommets. (I used 5,000 Blog Titles and Quotes to come up with a cute saying…) The color is beautiful, bright and true to what I designed. It’s also super easy- just upload your design (I made mine with MS Word, saved it as a pdf and uploaded it! So quick!) or use one of their design templates and … [Read more...]
Ghostly Halloween Tree
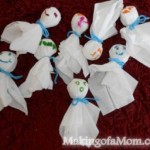
My girls have been asking to do a craft, and since I’m starting to put Halloween décor everywhere, it’s getting me in the mood for some spooky crafting! I decided to take a page from the Easter crafts we did and just make it Halloween-ish. While the kiddos were at school, I found a gnarly branch in the front yard, spray painted it black and stuck it in a pot on the front porch.When the girls came home from school, I had our stuff ready: a box of tissues, yarn (you could always use ribbon- … [Read more...]
Back-to-School Fiesta!

So last week, we had a party for the kids at our church. It was a Fiesta to celebrate the new school year and we had so much fun! My girls and I went into the the church gym the day before to get all the tables and chairs set up and then get it all decorated. It took 4 hours, but it looked so fun!!I purchased the tables covers, games, pinatas, bulk candy, and everything for our goody bags (bags, bookmarks, pencils, erasers, stickers) from Oriental Trading Company. I love them! They shipped … [Read more...]
Baby Shower!

So my friends and I had the honor of throwing our young friend a baby shower. This is the first baby for her and her husband and they are living far away from family, so we wanted to make sure that it was wonderful.Rose U set up her spacious back yard for the occasion and the weather was very obliging! Rose O brought her girls and between the 2 Roses and their girls, they did the decorations and the food. Their refreshments were fantastic! The Roses and their girls made a beautiful fruit … [Read more...]
Spring Into Action

Spring is finally here and as I woke up this morning to bright sunshine, I breathed a sigh of relief and started getting excited about doing more activities outside and the fact summer is just round the corner. As Easter is nearly upon us, I wanted to share a great project I came up with that you could do with the children during Easter.Hold an Easter tea-partyIt may sound a little girly, but I can assure you it is a great way to get your children (whether you have boys or girls or both) … [Read more...]
St. Patrick’s Day Roundup!

Since my Valentine Craft and treat posts were so popular I decided to jump on St. Patrick's Day and share some craft and treat ideas I found! On The Magic of Ordinary Things, she made a darling fabric wreath for St. Patrick's Day! She includes a tutorial and it looks pretty easy. I think I may attempt this since I am lacking in green decorations!While we are on the topic of wreaths, how about this super cute felt wreath by My Frugal Family? I LOVE it! And as the name of the blog … [Read more...]
Tissue Pom Tutorial
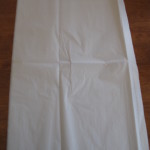
Ok here is my tissue pom pom tutorial. I am not expert, but as I said in my Cocoa Party post, I did make 30 so I knew a little something about them!1. Start with a flat rectangular piece of tissue paper. In my opinion the best tissue pom poms come out of 13 sheets of tissue paper. Less than that and they aren't very fluffy, more than that and it is VERY hard to cut the scalloped edge, plus it gets way fluffy very fast and it is hard to make it even. 2. Accordion fold the entire … [Read more...]

