So you’ve created a wonderful masterpiece in Silhouette Studio but somehow you have to make that picture on your computer come out of your Silhouette Machine. These Silhouette Machine Cutting Tips are what you need to get your project from digital to actual. Purchasing your vinyl cutting machine is a great way to expand your craft skills.
Silhouette Machine Tips: 4 Easy Steps to Cutting
 | 1. Set your cut settings |
 | 2. Print out your project |
 | 3. Load the machine |
 | 4. Send your project to the Silhouette |
Cut Settings, make sure you have cut lines for everything that needs to be cut out.
Printing, if you are printing something remember to add registration marks and then click print.
Loading the machine, line up the cutting mat on the rollers and press enter on the Silhouette.
Send to Silhouette, click the ‘send to silhouette’ button and the silhouette will start cutting.
Each of these steps is discussed in greater detail below (plus how to use the advanced cut features after that)
1. Cut Settings on your Silhouette Machine
The Cut Settings window is where you can choose what is going to be cut out. Click on the object that needs to be cut out and pick one of the 5 cut style options on the right-hand side.
- No Cut: the selected object will not be cut out
- Cut Edge: the selected object will be cut out; if there are two objects that are overlapping, only the outside edges will be cut
- Cut: the selected object will be cut out; if there are two objects that are overlapping, each object will be entirely cut out even in the overlapping parts
- Perforate Edge: the same as Cut Edge but cuts a dashed line around the object
- Perforate: the same as cut but cuts a dashed line around all the objects

In the Cut Settings window, you can also choose the Material Type you are using. There are a lot of pre-defined materials when you click on the one that you are using the blade settings appear. It will show you what setting the cutting blade should be on and gives you the option to change the speed and thickness. A slow speed is recommended for thicker materials or intricate designs. If you are using thick materials the Thickness setting should be on the high-end. I find that for most of my projects the default cut setting works just fine. You can do a test cut to see if you have the right cutting settings, that’s covered in Step 4 a.
2. Printing on your Silhouette Machine
If your project doesn’t involve printing you can skip to step 3.
One of the really cool things you can do with a vinyl cutting machine like the Silhouette machines is print out something on your printer and then have the Silhouette cut it out. But if you just print it out, stick it on a cutting mat, load it in the machine and click Cut, the Silhouette doesn’t know exactly where your shapes are so it might cut in the right spot or it might not. That’s where Registration Marks come in. When you go to the Registration Marks window, the Style is set to off; to add registration marks to your project click the drop-down and select either Type 1 or Type 2. The only difference between the two is that Type 1 as a square in the upper left corner and Type 2 has a bracket instead. The Silhouette uses these marks to find the correct starting position so it can cut things out exactly (more on the this in step 4b below). One thing to remember about registration marks is that the Silhouette will only cut lines inside the square and brackets (indicated by the blue lines in the picture below) and cut lines outside of that will not be cut (I found that out the hard way). In the picture below everything has to be inside the light blue lines.
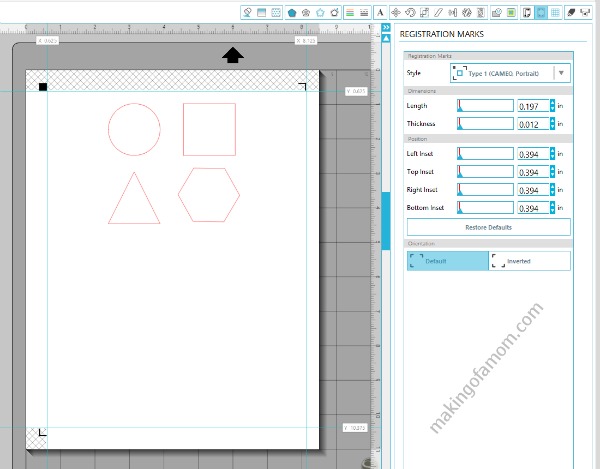
Once you have the Registration Marks set, click the print button and print it out on your normal printer
3. Loading the Silhouette Machine
There are two load options on the Silhouette: load cutting mat and load media. Load media is for everything that does need to be cut using cutting mat, like vinyl. When using a cutting mat make sure that your paper is good and stuck to the mat otherwise the mat might move but the paper does not and your project ends up getting cut in half.
On the Cameo, you can adjust the rollers to fit the width of the product you are using. The key to adjusting the roller is the blue lever on right-hand side just above the roller. It raises up that side of the roller bar so you can move the right roller to your position you need. You can’t move the left roller. When you have the roller in the right spot push the lever back into its original position.

To load the machine, push the cutting mat or media up to the rollers and hit the Enter button on the Silhouette.
4. Send To Your Silhouette Machine

All the settings have been set, you have the material loading into the machine, now you are ready to start cutting. But if you are cutting a new material that you haven’t cut before or your blade has seen a lot of use you might want to perform a test cut to make sure your cut settings will work.
a. Test Cut – a test cut cuts out a small square and triangle (the triangle is inside the square). To perform a test cut go to the Cut settings window click and on the material you are using. Under all the blade settings is the Test Cut section, you can use the arrow buttons next to the Test Cut button to position the material where you want to do the test cut. I usually hold down the Right arrow button for a few seconds and then the Down arrow for a few seconds; you can watch the machine has you are doing it. This is a really good way to test out your cut settings and if it doesn’t get cut out adjust your settings and do another test cut until you get the results you want.

Clicking the Send to Silhouette button will bring up the Send to Silhouette window. Click the Start button and the Silhouette will start cutting; unless you are doing a print and cut, if not you can skip section b
b. Registration Marks – the registration marks help the Silhouette know where to start cutting. The machine should detect the registration marks automatically and then start cutting, but sometimes the machine “can’t find” them. When the machine can’t find the marks for my project I usually eject it out of the machine and reload it and try it, then it usually works.


When the Silhouette is finished cutting, press the Enter button to eject it out of the machine and you’re done!
Advanced Cut Settings on your Silhouette Machine
Under the Cut Setting window, there is Standard and Advanced Cut Modes. We talked about the Standard setting above, but when you click on Advanced the Cut order options come up which gives these options Line Color and Fill Color, but if you have Silhouette Studio Designer Edition you get a third option Layers. I thought about trying to explain each option but I am a visual person so I thought I would show it all in a picture.

Cutting something out really is as simple as these 4 easy steps, but there other things that you can do to make sure your project turns out great!

Check out great deals from the Silhouette store, but only with discount code MAKING.
Silhouette Studio® Designer Edition contains all the same functionality as Silhouette Studio® plus the following designer features:
- Ability to open, manipulate, and cut .svg files
- Rhinestone tools to convert designs into rhinestone templates and create your own rhinestone designs
- Sketch tools to convert designs into several styles of sketchable art
- Creative knife tools to allow you to clip designs using different patterns
- Enhanced eraser set to modify designs with more precision
- Built-in ruler and guide lines for precise alignment and drawing
- Layers support (including ability to cut by layer)
- PDF import
- Nesting feature to allow you to arrange cuts as efficiently as possible—a scrapper’s dream!
- Shadow tool—allows you to add a drop shadow to printable designs
You can check out all of our Silhouette tutorials to help you create new projects or inspire new ideas.
More Silhouette Machine Ideas:
DIY Phone Covers with Silhouette Clear Sticker Paper
How to Use the Silhouette Fabric Cutting Blade


Hayley Kellard says
Thanks for this, so helpful! I’m just starting out with a portrait and it’s a bit intimidating at first.