The Back Story
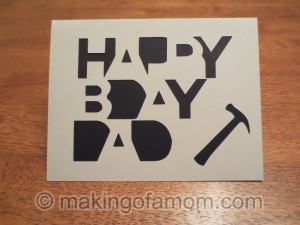
It’s my Dad’s birthday this week so I decided to search pinterest for birthday card ideas. Let me tell you there are a lot of dad birthday cards on pinterest and this is the one I decided to make.
As it is with most cool stuff I find on pinerest when I clicked on the pin it was a link to a picture. Here is how I made cut file for the card.
Happy Bday Card
You can import the picture into Silhouette Studio and use the Trace Tool make cut lines around all the black letter shapes. Looking at the cut lines that were created not all the edges were smooth or straight, it’s probably because that’s how the picture is so I decided to try make the cut lines by hand.
I tried drawing the cut lines for the card in Silhouette Studio; it was easy to make the straight line cuts but trying to make the curved cut lines was a little more difficult. Most of the time I was fighting against what Studio thought I wanted to do. I decided to abandon doing it in Studio and just do it in Inkscape.
For those of you that don’t know Inkscape is a vector graphic editor program with capabilities similar to Adobe Illustrator. Have you ever noticed when you make an image bigger or zoom in on it, the edges get all blurry and pixeled? With a vector graphic you can zoom in or enlarge the image as much as you want and the edges will not get blurry or pixeled that will remain smooth.
![]() I imported the picture of the card into Inkscape and then started drawing the black letter shapes on the card. I used the Bezier tool to draw the shapes. I would start and end my Bezier line at the same spot so I would create a shape instead of just a line. I used guide lines to define the top and bottom of the letters because they were not all the same height I also put in guides lines for the corners of the letters and then as I was drawing the bezier line it would just snap to that point. When I was done, I deleted the picture of the card and saved it as an .SVG file. Here is a picture after I had drawn all the letter shapes. (If you would like me to make a video of drawing the letter shapes in Inkscape, let me know in the comments and I will see if I can put something together)
I imported the picture of the card into Inkscape and then started drawing the black letter shapes on the card. I used the Bezier tool to draw the shapes. I would start and end my Bezier line at the same spot so I would create a shape instead of just a line. I used guide lines to define the top and bottom of the letters because they were not all the same height I also put in guides lines for the corners of the letters and then as I was drawing the bezier line it would just snap to that point. When I was done, I deleted the picture of the card and saved it as an .SVG file. Here is a picture after I had drawn all the letter shapes. (If you would like me to make a video of drawing the letter shapes in Inkscape, let me know in the comments and I will see if I can put something together)
In order to open SVG files in Silhouette Studio you need to have Designer Edition. I opened the SVG file in Studio and then made cut lines for the card itself. I wanted the card to fit inside an invitation size envelop so I made the card 8.5 inch x 5.5 inch, with a perforated fold line across the middle. I usually make fold lines for cards by making a square that is half the height of the whole card (4.25 x 5.5 in this case), and use the Align Tools to align the whole card and the half square with Align Center then Align Top.
I draw a cut line across the middle and then delete half square. Instead of putting a heart in the bottom right hand corner of the screen I found an SVG file of a hammer. To add cut lines to the SVG files, click on one of the SVGs, go to the Cut Style Settings and click Cut Edge. Now the card is ready to be cut out.
To match the card in the picture I also cut a 4.170 inch x 5.5 inch black square to go behind the cut out letters on the inside of the card. Here is a picture of the finished card.
Here is the download for the door and windows cut file.
If you want to see how I made the letter shapes in Inkscape I can try and make a video that show me doing it. Let me know in the comments.
Silhouette has monthly promotions so be sure and check the Silhouette store to see the bundles sales and the special materials discounts. You have to have a discount code for sales prices to appear so use discount code MAKING for sale prices!
Last week’s tutorial was how to make a Pretty Pink Castle Valentine Mailbox.
Have an idea for a project you would like to see as a tutorial, leave your idea as a comment or send an email.


Sam Dock says
This is cool. My dad would be like “what does it say” lol
lisa says
That’s cute. It seems like it takes a lot of work though.Yes, I am that lazy!
Jason says
Hey, I did all the work for you, just download the files 🙂
Sherry says
What a great idea for Dad’s day! Thanks for the instructions.
Ari says
Wow that’s so professional looking! I am not familiar at all with Silhouette Studio or Inkscape for that matter, but I think your instructions are pretty straight forward. The hammer is a great addition! My dad would totally apply; he’s a fix-er-up-er! This would be a great card for Father’s Day! Thanks for sharing!
Jason says
My Dad just came to visit and we spent the whole time building basement shelves, so I thought the hammer who be perfect for him
Julius Lokietek says
Electronic cards are the ultimate free birthday cards. The selections are endless and run the gambit from the tongue in cheek funny, to the preposterous and oblique. You may choose to add a variety of sounds to your graphic selections, as well as the opportunity to add as much or as little personalization as you choose. For those with a talent for words, this is the perfect vehicle for a birthday poem to send to the happy celebrant. Of course, an added feature is the fact that you not only save money because you are not purchasing cards themselves, but you also save because you do not have to pay for postage! In addition to the foregoing, if you are truly in a pinch for time, these cards can be sent before midnight and still arrive on time for someone’s birthday! Truly a procrastinator’s dreams come true.:
Look at all of the most popular short article at our own online site
<,http://www.caramoantourpackage.com/caramoan-tour-package/
Abrasive Mixer says
Hey there excellent web site! Person. Wonderful. Fantastic. I most certainly will save your blog plus take the bottles additionally? I am very happy to locate a great number of useful facts here inside the placed, we want come up with extra techniques about this reverence, appreciate expressing.