My wife and I have wanted to get a Silhouette Cameo for a really long time, so when Black Friday came around and we saw that the Cameo was on super sale, we thought it was too good to pass up so we bought one. Here is a tutorial for one of our first Silhouette projects.
The Back Story
One of the classes that my wife took in college talked about human development. In the section that talked about babies, she learned that when babies are first born they can only see black, white and red (sounds like the beginning of a bad joke, right?). So when my daughter was born my wife thought it would be fun to make some patterns to hang on the wall for her to look at when we were changing her diaper. We made a checker board pattern, we made it using a big square punch and glued each square on to a 12×12 piece of card stock. With the recent birth of our third child and the recent purchase of the Cameo, we decided to let the Cameo do all the work this time. Enough with the the long introduction, now on to the tutorial.
The Checker Board – Baby Art
After opening Silhouette Studio, open a new drawing, you can do this 3 ways: up at the top left of Silhouette Studio you can go to File -> New, press Ctrl+N, or click the new drawing button. The default page size for a new drawing is a 12×12 inch sheet with a 12×12 cutting mat. All these page settings can be found in the Page Tools.


I used the Rectangle Tool to draw a 1×1 inch square (hold down the SHIFT key for a square with equal sides). You can use the Specify Dimensions in the Scale Tools to set the Width to 1 in and the Height to 1 in. If you check the Lock Aspect Ratio box, it will ensure the square (or any shape) will be resized proportionally when only one dimension is being changed.

Using the Align Tools, I centered the square to the page using the Center to Page.

Next I put 4 squares around the first square; to get all the squares to be lined up in the right spot I used Guide lines (the Guides feature is only available with the Designer Edition upgrade to Silhouette Studio). I put guides on all the sides of the middle square:
Horizontal: Y 5.500 and Y6.500
Vertical: X 5.500 and X 6.500
Then for the new squares I put guides at:
Horizontal: Y 5.435 and Y 6.560
Vertical: X 5.435 and X 6.560
Be sure to check the box to Snap to Guides so the new squares snap right into place. I just used copy (Ctrl+C) and paste (Ctrl+V) to make the new squares and then dragged them to the right position.

I selected all 5 squares then grouped them, so I could copy, paste and move five squares at once. I put guides around the original 5 squares:
Horizontal: Y 4.435 and Y 7.560
Vertical: X 4.435 and X 7.560
Then for the new groups of squares:
Horizontal: Y 4.375 and Y 7.625
Vertical: X 4.375 and X 7.625

Then I added four more groups of 5 squares with guides at:
Horizontal: Y 3.310 and Y 8.585
Vertical: X 3.310 and 8.585

(new squares highlighted in yellow)
Then I started filling the single squares in-between the blocks of 5, I ungrouped one of the blocks of 5 to copy an paste a single square.

(new squares highlighted in yellow)
Then I had to add squares around the outside. I used a single square and put guides at:
Horizontal: Y 1.185, Y 2.310, Y 9.685 and Y 10.810
Vertical: X 1.185, X 2.310, X 9.685 and X 10.810

(new squares highlighted in yellow)
Now you should have the check board pattern

(You can easily hide all the Guides lines by un-checking the Show Guides box)
I used a 12×12 piece of white cardstock. When you are ready to cut, click the Send to Silhouette button and that will bring up the Send to Silhouette options. Click on the Change Setting link to go to the Silhouette Cut Settings, there you can pick you paper type. There is not an option for plain card stock, I have found that a blade setting of 4 works well.

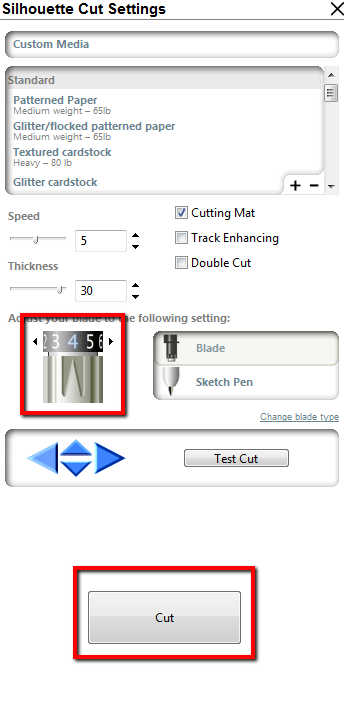
When everything is set click the Cut button.


Downloads
| Baby Art Checkerboard (Silhouette Cut File) |
Printable
Baby Art Checkerboard printable (PDF)
If you have any questions about something I did leave it in the comments or send an email. I’m also open to other questions about the Silhouette, Silhouette Studio software or other project ideas.
Silhouette has monthly promotions. Visit the Silhouette store for bundle deals and sales on special materials. You must have a discount code for special sale pricing to apply so use code MAKING for great deals!
I have looked at probably hundreds of Silhouette tutorials, most of them have been video tutorials and only a small handful have been pictures and text tutorials like this one. Let me know what kind of tutorials you like in the poll below.
[polldaddy poll=6850891]


[…] week’s tutorial was how to make a checker board pattern for baby […]