Picnics and outdoor activities are excellent ways to entertain young kids, but in the fall, the weather doesn’t always cooperate with your outdoor plans. So what do you do? The solution is easy: have an indoor picnic instead! There are even perks to an indoor picnic that you don’t get in the great outdoors:
you can get creative, use food you already have in your kitchen, and stay bug-free. The next time the cold weather gets in the way of your plans, follow these suggestions for a fun and delicious kid-friendly indoor picnic:
Bring Nature to You
Whatever you do at your indoor picnic, do not sit at your kitchen table! To get the true picnic experience in your home, clear out a room, spread a picnic blanket and prop yourself up on some pillows for a relaxing, spacious feel. If you want to go all out, play some nature sounds like waterfalls or
birds chirping to really feel like you’re outside. Have kids bring along their stuffed animals so you can truly get in touch with “nature.”
Turn Outdoor Games into Indoor Games
Don’t break out the board games just because you’re inside. There are plenty of ways to tone down a few outdoor games to make them safe to play in the house instead of in an open field. Try indoor mini golf, for instance: use ping pong balls or bean bags as your “golf balls” and have kids putt into tipped-
over laundry baskets or mugs. Just make sure to avoid balls that could break something if they’re hit too hard.
Crank Up the Heat
Even if it’s windy or rainy outside you can still make your picnic feel warm and sunny. Crank up the heat in your house or turn on some heat lamps to feel like you’ve been basking in the sun all day long. If you put on your favorite summer dress or shorts and close your eyes, you won’t even notice you’re still
indoors!
Serve Smart Picnic Food
It’s just not a picnic without delicious picnic food, but typical outdoor foods like gloopy potato salads, salty barbecue and beefy burgers are just not good for you. If you’re staying at home, you won’t be as tempted to pack along traditional unhealthy meals and you can use what you’ve got in your kitchen to
make healthier options that still feel outdoorsy. You’ll have an oven and a stove, so use them instead of buying fried options like you might when you’re going somewhere outside your house.
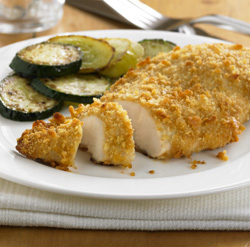
This recipe for Baked “Fried’ Chicken is perfect for an indoor picnic—it takes only about a half hour to make so your picnic festivities won’t be interrupted and it’s a healthy twist on the unhealthy picnic classic. Enjoy!
Baked “Fried” Chicken
Prep Time: 10 min
Total time: 35 min
Servings: 4
Ingredients
- PAM® Original No-Stick Cooking Spray
- 18 round buttery-flavored crackers, crushed into crumbs
- 3 tablespoons grated Parmesan cheese
- 1/2 teaspoon garlic powder
- 4 boneless skinless chicken breasts (5 oz each)
- 1/3 cup Parkay® Original Spread-tub, melted
Preheat oven to 400°F. Spray baking sheet with cooking spray and set aside. Combine cracker crumbs, cheese and garlic powder in a shallow dish; set aside.
Brush both sides of each chicken breast with Parkay. Roll each breast in the crumb mixture. Place coated breasts on a baking sheet.
Bake for 20-25 minutes or until no longer pink in the centers. If you’re using a meat thermometer, it should read 165°F.
Some Extra Cooking Tips:
- If you like your chicken extra crispy, bake coated breasts on a cooling rack set on top of a baking sheet.
- Get the kids involved with cooking! Put the crackers in a closed plastic bag and let them use a rolling pin to crush everything up.
Meredith writes on behalf of PAM. From baking for an indoor picnic or grilling at an outdoor one, PAM cooking spray makes everything easier. For more cooking or baking tips or recipes for your next picnic, visit www.pamcookingspray.com.


tami s says
Great idea for the winter months. Long weekend so I’m going to do this on Monday