Hi, I’m Erin! I was asked to post a tutorial on how to make Fancy Flip Flops and I am excited to share!
When I first wanted to make the flip flops, or “Fancy Flops” as my daughter and I call them, I had difficulty finding a tutorial of any kind. The process of which I make them now has taken two years of trial and error. We had a lot of “flops” until finally I came upon a few ideas! This is what I will share with you today and hopefully you can save a couple years by my sharing what I’ve learned.
The supplies you will need for this project are as follows, a pair of flip flops in a size/color of your choice. I usually buy ours from Hobby Lobby.
You will also need a roll(@ 3 yards)of 5/8” or 7/8” grosgrain ribbon in a print or solid color of your choice. For this tutorial, I am using 5/8” ribbon, though I tend to prefer the 7/8”. You will also need a sturdy needle and embroidery floss of any color. For gluing purposes, you will need E6000 glue to adhere the ribbon to the straps and a hot glue gun to attach the bow or other accent of your choice. If you don’t already know how to make bows, I highly recommend mommycraftsalot on YouTube. Her tutorial videos are great and I will be using her tutorial to make the pinwheel bows for today’s project, although I differ some by hand stitching the bows for sturdiness. For fancy flops you can attach any bow style you prefer, but for ours I like the lower profile of the pinwheel style bow.
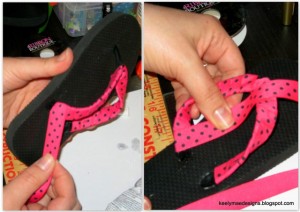
Ok, let’s get started! First you will need to take a piece of sandpaper and rough up the straps on your flops. Once completed, wash the straps with soap and water to remove all the residue left behind. Be sure to dry them thoroughly before applying any of the E6000 glue. Take your ribbon and remove it from the spool. This will make it easier (well kind of) to pass through your straps as you wrap it around. Take one end of your ribbon, cut it straight, and seal your end with a lighter as the picture shows below. When you sealed your end, apply a dab of the E6000 glue to the outside end of the strap.

Wrap the ribbon around the same end one-two times (apply a dab for each layer, this is to prevent unraveling with wear) pulling tightly as you do and then continue to wrap around the entire strap, gluing on the underside as you go. Once to the middle, you will continue to wrap on the other side of the toe strap.

Try to keep it as continuous of a motion as you can and pull tight as you go. Don’t be concerned if your middle isn’t completely covered, because that is where your accent of choice will be and it will hide that spot. When you come to the end of your strap, you will repeat your first steps by wrapping around one-two times and then cut off the excess ribbon as straight as you can. Seal the end of the ribbon and glue down.

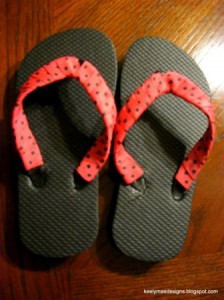
Repeat the same steps for the second flip flop, starting from the outside of the flip flop. When you have completed lining your flip flops with ribbon, they will resemble the photo.

The flip flops will need to sit over night to allow the glue to set. It’s important to allow the glue to set and always be sure to work in a well ventilated area when working with this type of glue, as it gets very smelly!
On day two, you will attach your bows or the accents of your choice. With some of our flops, I learned that simply gluing on will not hold for more than a few weeks and unless you want to keep reattaching, I find it is best to hand sew on the bows. Take your hot glue gun and apply a dab of glue to the center of the flip flop. Stick your bow on, be sure to center it as you do. Once attached, take some embroidery floss and thread it through your needle. Knot off the end and take the floss around the center of the bow with the knot in front of the flip flop and placed the floss on the outer side of the toe strap. Take the needle and thread between the strands of floss.

Pull until the knot is positioned against the toe strap underneath the bow. Take the long side of the thread and wrap around both sides of the toe strap and then double knot off and cut off the excess floss. Repeat on the other flop. Once sewn on, take your middle accent ribbon of choice, seal the end and wrap as to cover the string and glue as you go, using your hot glue gun. Again, start on the outer side of the toe strap and wrap on both sides of the toe strap. This is the tricky part of the whole process! Once completed, you have an adorable pair of fancy flops!

I decided with ours to go one step further and put a middle accent on our bows, Hello Kitty to match a hair bow that I also made for my daughter.
 Hopefully you all enjoyed this post and a big Thank You to Stefanie and Johanna for the opportunity! Happy Crafting!!
Erin Dashiell is a wife and a mother of 2 children. She enjoys making handcrafted bows and other amazing and adorable accessories for her children’s outfits! We have raved about her store KeelyMaeDesigns several times on our blog. She is always adding new items to her site, so check out her blog and like her on facebook!
