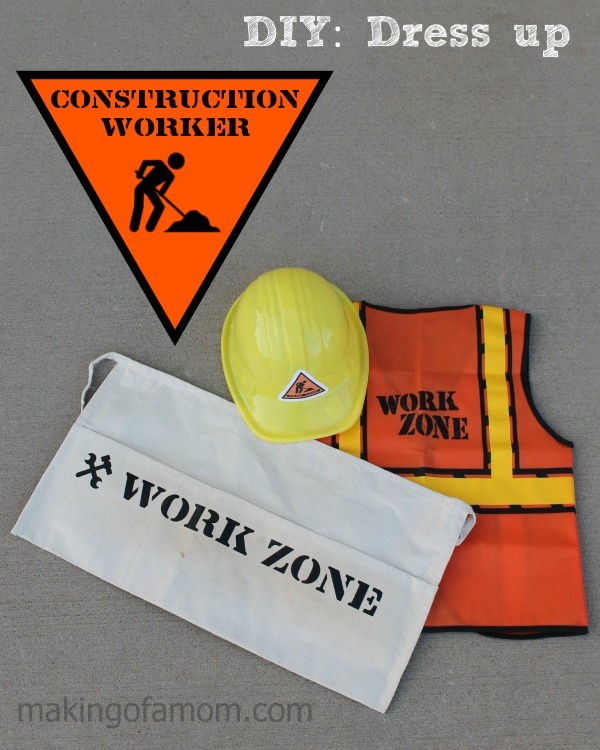
 This is DIY Dress up #2 – the Construction Worker (Check out #1). In this set we have:
- Construction Worker vest
- Construction hard hat
- Tool belt

Construction Worker vest
We picked up a Construction vest at our local JoAnn craft store and decided to accessorize the “Construction Worker” with some easy DIY crafts.

A Construction Worker uses a lot of tools to get the job done, and where does he keep those tools? In a tool belt!
Tool Belt

I say this in every heat transfer post and I am going to say it again (because I keep forgetting): cut out the mirror image. When the cut out gets ironed on it’s the right way. In the screenshot above the design is on the left and on the right is the actual cut area. I like creating my design and then make a mirror using the Replicate window.

The font I used was LINTSEC
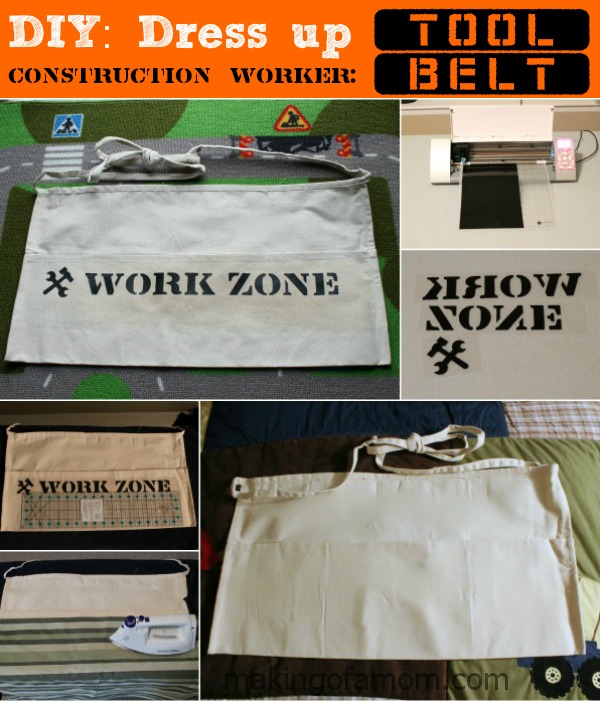
I only had a small piece of black heat transfer so I had to make everything fit in the space I had; normally I would have cut it out all in a straight line. To make sure I had everything lined up I just used a ruler. I used a thin towel to get the most heat possible to the transfer material. One important thing I learned (and that Stefanie reminded me about again) is to heat it up with the iron, let if cool off and then try to peel away the backing. When using heat transfer material make sure all the heat transfer material gets nice and hot then let it cool; once it’s cool try peeling off the backing, if the heat transfer material isn’t stuck start the process over again.
Cut File Download
| DIY Dress up: Construction Worker Tool Belt Silhouette File |
Need some help going through the cutting process? This post (4 Easy Steps to Cutting on the Silhouette) has a step by step guide to get you through it.
Printable Version
DIY: Dress up – Construction Worker tool belt printable (PDF)
Construction Hard Hat
You can find a hard hat like this at most any craft or costume store, but here is how to make a custom sticker for the front.

I searched for a free svg file of a construction sign and found one with the construction figure I wanted but the sign was a diamond shape and I wanted it to be a triangle so I could add ‘work zone’ to keep with the theme of everything else. I opened up the file in Inkscape to use the pieces I wanted. Here is a picture tutorial of how I made it.

Creating the Triangle
- Create a triangle using the stars and polygons tool (set corners to 3 and spoke ratio to 0.5)
- Make the fill color orange, the stoke color black and the stoke width 6
Adding the Details
- Drag the figure from the diamond sign and put in on the triangle sign
- Add the words “work zone” using the Cargo Bay font
After the sign was finished I saved it as a svg and then opened it in Silhouette Studio (P.S. you need designer addition to open svg files). When you go the folder where you saved your svg file most likely you won’t see it, you will have to select it from the File of type drop down. When I am cutting something out of sticker paper I like to make it look like with a white border around it, which is really easy to do in Silhouette Studio. First select the triangle (I had to ungroup to get just the trianlge because as a group I was selecting the figure and the words). Go to the Offset Window, click Offset, put in a Distance of 0.250 and click Apply.

In order to make this new triangle a cut line, go to the Line Style Window, set the Line Thickness to 0.0.

The final step is to go to the Cut Setting Window, click on the new triangle and then click Cut Edge.

This post (4 Easy Steps to Cutting on the Silhouette) has a step by step guide to get you through the entire cutting process.
Cut File Download
| Hard Hat Triangle Work Zone Tag Silhouette File |
Printable Version
Hard Hat Triangle Work Zone Tag Printable (PDF)
Our son really liked going around the house “”fixing” stuff will all his Construction Worker gear!
It is really fun to be able to make easy dress up outfits for my son!


Lisa says
While construction the worker need the construction dress up. For this purpose, the DIY Dress Up provides the construction dresses in which you can get Construction Worker vest, Construction hard hat, and the Toolbelt. I am sure after taking it you can tell others to take it from the DIY Dress Up.
app
Adam says
Hi Jason,
I agree with all that you discussed here. Of course, tool belts are essential equipment for construction workers. Carry on such wonderful tips and blogging!
Noah says
This is truly an enjoyable DIY task. Surely, I’ll share these tips with my kids and definitely they accept it warmly. Jason, thanks for the wonderful tips.
Retaining Walls says
A construction worker is an individual employed in physical labor of the construction of the infrastructure and the constructed environment. There are different types of construction workers, the manual work, the electrician, plumber, roofer and bricklayer are some of them. A construction worker’s hat has to be designed keeping in mind his work style. There are many hats available in the market, such as, a construction hard hat, a construction worker visor and a safety apron. The construction hat has to be water resistant, rugged, resistant to ultraviolet light, easy to wash and maintain, etc., Thus the selection of a hat depends on the type of work being performed. The working conditions of a construction job would determine what kind of hat is to be bought. The working conditions of a construction laborer also depend on the climate where he works. If a laborer is working under hazardous materials, then a hard hat should be worn. Construction workers will usually wear a safety apron, when not performing their daily activities.
Fabrication says
Great job! The seams looks very nice. That was a ton of stitching to rip out in the beginning.