 Wondering how to make a great-looking present for birthdays, holidays or
housewarming parties? Making your own floating candles at home is an
incredibly simple project that looks fantastic and can be done with ingredients
you likely already have around your home!
To get started, you’ll need:
- Paraffin wax or old candles.
- Play dough.
- Cookie cutters.
- An old, clean tin can.
- A saucepan or pot.
- Candle wicks.
- A pencil, pen or Popsicle stick.
1. Shape your can. Pinch the sides of the can at the top to
create a teardrop shape. The point makes it easier to pour melted wax out of
the can later on.
2. Melt your wax. Melting wax is simple when you use a
double-boil method. Put your paraffin wax or old candle pieces (break them
up first) in the bottom of the tin can. Fill your saucepan or pot with a few
inches of water, then place the can in the water. Make sure that the water
doesn’t approach the edge of the can – getting water in your wax means you’ll
have to start all over again! Place the pot on the stove and let the water boil.
You can make your candles scented by stirring in a few drops of essential oil
into the melted wax.
3. Roll out your dough and press the cookie cutter in. Roll
out the play dough into a 1/2″ sheet. Make sure it’s big enough for your cookie
cutter to fit. Press the cookie cutter into the dough, but stop before you press
all the way through. The goal is to indent the play dough slightly – if you cut all
the way through, you’ll wind up with a waxy mess on your hands. Hint: Roll
out the dough onto aluminum foil or an old baking sheet so you can move it
once you’re done.
4. Prepare the wick. Cut your wick to just a couple of
inches long – just tall enough to sit over the edge of the cookie cutter. Place
the wick in the middle of the cutter, then use your pen, pencil or popsicle stick
to keep it upright.
5. Pour the melted wax. By now, your wax should be
completely melted. Using a potholder or tongs, remove the tin can from the
pot, then slowly fill the cookie cutter with the melted wax, ensuring that the
wick stays upright.
6. Wait! Now it’s time for the hardest part – waiting! It’ll take
about 45 minutes for your candle to solidify, though you can speed up the
process by putting it in the freezer. While you’re waiting for it to solidify, don’t
remove the cookie cutter!
Once you’re absolutely sure your new candle is solid, pop it out of the cookie
cutter and peel away the play dough from the bottom. If you’re having a hard
time removing it, place it in the freezer for a few minutes. Trim the wick on
either side, leaving about 1/4″ on top. Place it in a bowl of water and light the
wick carefully to enjoy your floating candle.
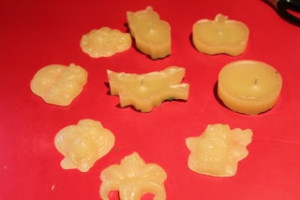
Floating candles make excellent presents – make several in different shapes
or colors to use as party favors or to give as gifts. Add some pizzazz to your
present by giving them in a gorgeous crystal bowl, or stack several on top of
each other, then wrap in fabric and finish off with a pretty ribbon. Homemade
gifts are a great way to save money and show off your crafting prowess!
About the Author
Carly Lance is a blog coordinator for Personal Bankruptcy Canada, a company that helps “good people
with bad debt”. Frugal may be her middle name, but Carly does it with class –
which is why she loves to write about saving money, to help others learn from
her cheap (but classy!) ways.

