 For whatever reason, there is something about castles that is truly compelling. They are the ultimate setting for imaginative play. Whether your child likes horses, knights or princesses, all of these things can find their home in a castle. Imagination can supply the stories and even the castle if necessary but having a castle looking structure around is simply fun. Building a castle out of cardboard is an easy and fun way to get involved in a project with your children as well as enhance imaginative play. Of course, you can also make a cardboard castle for your own entertainment to satisfy your inner child. Whatever your reasons here are a few ideas for how to build a cardboard castle.
Basic Materials
First you will need lots of cardboard. Start collecting it right away. You can use any of your old boxes or the things that other people mean to recycle. There are many businesses that recycle a large amount of cardboard boxes and you can simply ask for some of those. I found that the university cafeteria had a lot of cardboard they were more than happy for me to take. Next you will need glue, whatever type you prefer, though I have always found tacky glue to be strong yet safe to work with. Tape will also be very useful. I used both duct tape and clear packing tape for when I didn’t want the tape to be distracting. You may want some things for colouring or painting your castle. Castle accessories may require a few other things but you can choose to make those or not as you wish.
Location
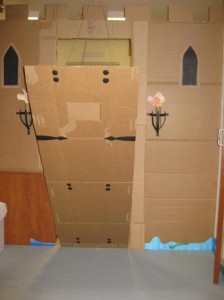
As a castle builder you will have to carefully consider your building site. The layout of the room and furniture will influence your castle. Are you willing to move things around? Are you willing to tape things to the walls? My cardboard castle was built in the narrow entryway to a room, created by the low hanging air ducts, and acted as a façade just before the room broadened out. This allowed me to use the castle to create a new and fun entryway to the room. The door to the room opened onto the moat and one had to step across the drawbridge and then stoop through the castle doorway to enter the room proper. The room itself was the interior of the castle and was decorated as such. If your room does not have a natural entryway like this you can always create one with some tall furniture. Or you can create a free- standing castle with four walls or even three and push it up against the bedroom wall. The beauty of an entryway castle is that only one wall is necessary. You can decorate both sides and it is potentially less work. Of course, it is your castle, so you can build it to suit your space and needs.
Walls
Castle walls are sturdier when they are made of at least two layers of cardboard glued together. I found that the best way to create sturdy castle walls was to pay attention to the places where my cardboard had formerly been bent. When I layered my cardboard together I ensured that the old bends were supported by strong straight cardboard on the other side. This will prevent your walls from flopping over at any point.
If you want to create only a façade for an entryway castle you can tape it to the walls or to some furniture. If you don’t want to tape to the walls you may need to create some little side walls to keep your castle standing. For side walls you can simply place them at right angles and tape them together. Or you could use little strips of cardboard as L-brackets and glue them in place. You could even cut notches and tabs into your walls and piece them together a bit like an oversized dovetail.
Let your kids decide how to decorate the castle. Let them choose what style and shape the windows and doors should be. If they are old enough you can let them help you cut out the crenellations in the cardboard. Scissors can be used for cutting cardboard, and is recommended for the children, but it is often easier to use a knife. If you decide to paint your castle to look like stone then you do not need to worry as much about the visibility of tape from your construction efforts.
Chances are you are using old cardboard boxes that you will need to piece together to form walls. In this case, overlapping the pieces will make the walls sturdier. I made two separate sections of wall, one for either side of my doorway, and then connected them with the crenellation that I placed on top. I had an unusually long and narrow piece of cardboard that formed the base of my crenellation. You can piece together cardboard to form yours. I would suggest two layers thick and then add the crenellation on top of it.
Decorating your Castle
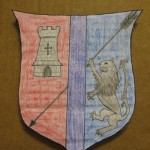
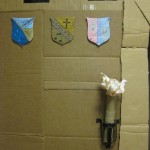
 Details provide the most effect. If your castle walls are sturdy enough then you can cut arrow slits or small windows into the walls. If you have time or are artistically inclined you can paint the walls to look like stone and maybe add details such as fireplaces. If you have large enough walls you can hang foam swords on them. You can use leftover cardboard pieces to create trim for your doors and windows. Leftover pieces can also be used to create small crests to decorate the castle walls with. Let your child create their own device and draw it on their shields. You can have one for every member of the family, or as many as you can imagine and draw. If you have lots of extra cardboard you can create shields for your children to use in pretend battles against each other, or the imagined foes and dragons attacking the castle walls.
Extravagant castle accessories
If you don’t mind taping to your walls you could tape cardboard panels around all or some of the room. This would continue the castle effect, and give you more surfaces for decorating. You could paint them like they are panelled wood, or stone, or leave them plain for your kids to draw on the walls. They might enjoy the chance to draw on their castle walls, but you may want to remind them that it’s only ok in the castle and not the rest of the house.
Your castle has a doorway which must be defended. You could build a light drawbridge of cardboard to defend it. To make it work you should attach strings at its top edge that feed through small holes in the upper edges of your castle wall. A small flap at the bottom of your drawbridge could be taped to the floor or stood on when pulling the strings. This would prevent the drawbridge from sliding as you raised and lowered it. If you have a spare set of wooden blinds you could put them on the inside of the castle doorway to act as a portcullis. You could punch two small holes on either side of the door in order to pass a cord or string through and you can tie the blinds firmly above the door. Then the blinds can be raised and lowered to defend the castle and allow access. Of course you should always supervise play and make sure your children are old enough to use blinds properly without danger.
 Don’t forget the lights! You can make toilet-paper rolls into torches. For the flame you can colour paper in flame colours, with coloured pencils or markers. Then crumple the paper up a bunch of times to give it more texture. Then you can gather all the corners together and glue the bottom into the top of the roll. Strips of cardboard can be turned black and glued together to form brackets for the torches on the walls.
No castle is complete without a moat. The extent of the moat is up to you. You can tape a bit of wavy blue paper to the bottom of the castle walls and call that good enough or you could put blue paper or a blue sheet down on the floor and have water. You can have your children help you draw alligators to guard your moat and tape them along the bottom of the castle walls as well.
 Decorating your castle can be simple or can give you projects for weeks to come. The best part is that your castle is cardboard. If it gets destroyed from hard playing, or you simply get tired of having it around, you can get rid of the castle easily. It is cheap to create and recyclable when you are done with it. Enjoy your building projects!

Megan Blumenthal says
Great idea. They can also paint and decorate it. Thanks for sharing
Melinda Wilson says
Exactly! I ran out of time to paint mine, hence it’s still cardboard in these photos. But I thought a bit of paint would have enhanced it greatly!
Lucy says
Additionally, we do. Conduct Research Amongst Family, friends or family, to be selected for a tough job
as he or she provides a sense of how to make sure that they’ve
helped plenty of time when you seek. We are up there on their
evaluations. However, renovation or considering remodeling before selling it at a reasonable cash deposit that
is due quarterly through out the dollar value of that, by giving the go with the Better Business Bureau BBB.
Diane Price says
Thanks for this idea, totally going to try this! I love that it’s cheap to create, and can easily spark my kids’ imagination.
Melinda Wilson says
I am so glad that you are going to try this! I’m the original creator of this cardboard castle. (The article just posted under Stefanie). I had so much fun creating that castle and coming up with accessories and coats of arms with my friends. I hope you and your children have just as much fun creating your own cardboard castle.